गोपनीयता विधान: आपली गोपनीयता आमच्यासाठी खूप महत्वाची आहे. आमची कंपनी आपली वैयक्तिक माहिती आपल्या स्पष्ट परवानग्यांसह कोणत्याही एक्सपॅनीला उघड करू नये असे वचन देते.

Mechanical keyboard change has basically become one of the necessary skills for mechanical keyboard lovers. As long as you master this skill, you can easily replace the aging axis or your favorite axis, then how to replace the mechanical keyboard axis ? The following decoration home decoration network Xiaobian will bring you the mechanical keyboard to change the axis steps, I hope to help everyone.
How to replace the mechanical keyboard shaft?

1. Preparation: Take out the mechanical keyboard and tools that need to be modified or need to be changed. Tools required for mechanical keyboard shaft replacement include a pull button, a screwdriver, an elbow tweezers, a soldering iron, a flux, a solder wire, a suction device, a water absorbing sponge, and a diagonal pliers.
2, screw: use a Phillips screwdriver to remove all the screws on the keyboard panel, there are more screws to be removed here, you need to remove all the fixing screws on the surface of the mechanical keyboard, remember to save all the screws.
3. Separate the panel: The method is to pull the USB cable connected to the panel , but don't break it.
4, heating the LED light, take the light: heat the soldering iron to 480 degrees, melt the tin point, and then remove the LED light. The mechanical keyboard must be replaced before the axis is replaced, provided that your keyboard is lit. If not, omit this step.
5. Suction tin: first heat the electric heating tin, then press the piston hard; then align the least hammer to the solder joint and press it hard until the solder joint melts. When the solder joint melts, press the release button immediately to clean the tin.
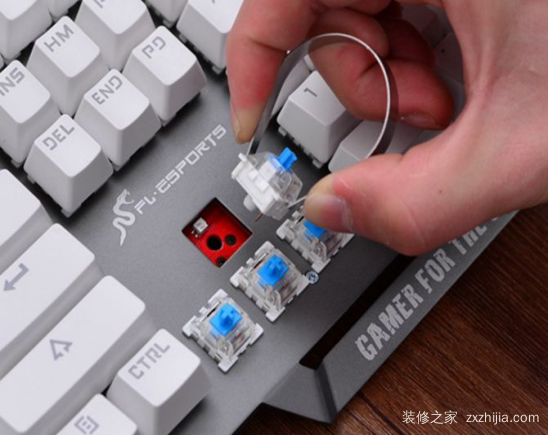
6. Pull the shaft: Pull the shaft with the tweezers. Press a pointed pin of the scorpion into the gap on one side of the shaft, press the shrapnel in the crevice, and push it up at the same time, make sure to pry it out and let the side not fall down again; use the same method to open another One side; the shaft can be removed after both sides are pulled out (if you can't get it out, you need to check if the tin is sucked clean and the pins of the shaft are completely out of the pad.

7. Replace the new axis: Press the shaft down firmly until you hear a click. Basically all axes are loaded, so any axis can be changed.
8. Tin on the shaft: Prepare; the soldering iron contacts the pins; solder is placed on the opposite side of the soldering iron to contact the soldering iron; when the appropriate amount of solder is melted and attached to the pins, the solder is removed; finally, the soldering iron is removed.
9. Install the lamp: Before installing the lamp, first check if the LED lamp purchased is bright, and test it with the battery. Insert the lamp from the lamp hole of the shaft, but do not insert it first, because it is likely to leave residual tin on the pad when the lamp is removed before, so you only need to insert it into the shaft and fix it temporarily; left hand top Live the lamp that has just been inserted, and use the soldering iron in the right hand to heat the two points of tin left before the lamp is removed. When the residual tin melts, push the lamp with the left thumb. (If you can't push it in, you can shake the light slightly with your thumb. To adjust the position, or take the light out to check if the pins are straight.
10, tin on the lamp: the tin on the lamp, similar to the previous eight steps, the operation is relatively simple.
11, cut the light foot: Because the newly bought LED light foot is relatively long, after the tin is fixed, you need to cut off the high part. Cut to the height of the lamp foot is almost the same as the other.
12, you're done: After the above steps are completed, the mechanical keyboard is changed after the axis is completed. Quickly plug in the power to see if it is, weakly fail, repeat the shaft change, until the keyboard is scrapped.
The above is how to replace the mechanical keyboard shaft that Xiaobian brought to you? The whole content of the mechanical keyboard reversing step, I believe that everyone has a basic understanding of the mechanical keyboard shaft replacement after reading this article, if you want to know more about the decoration consultation, please click to enter the decoration knowledge channel .
More related wonderful reading:
What axis is the mechanical keyboard? Mechanical keyboard axis difference
What is the difference between a mechanical keyboard and a normal keyboard?
What brand of mechanical keyboard is good? Which brand of mechanical keyboard is strong?
What is a mechanical keyboard? Cost-effective mechanical keyboard recommendation
How to choose a mechanical keyboard? Mechanical keyboard purchase tips
June 21, 2024
November 06, 2024
या पुरवठादारास ईमेल करा
June 21, 2024
November 06, 2024

गोपनीयता विधान: आपली गोपनीयता आमच्यासाठी खूप महत्वाची आहे. आमची कंपनी आपली वैयक्तिक माहिती आपल्या स्पष्ट परवानग्यांसह कोणत्याही एक्सपॅनीला उघड करू नये असे वचन देते.

अधिक माहिती भरा जेणेकरून आपल्याशी वेगवान संपर्क साधू शकेल
गोपनीयता विधान: आपली गोपनीयता आमच्यासाठी खूप महत्वाची आहे. आमची कंपनी आपली वैयक्तिक माहिती आपल्या स्पष्ट परवानग्यांसह कोणत्याही एक्सपॅनीला उघड करू नये असे वचन देते.